Deploy application on your server
There are two ways to get the before trust enabled version of the application:
- To download the application ZIP file containing the WAR and configuration file please click the button below.
Download Application ZIP - Download the application source files and configuration file from GitHub and build on your server. The GitHub page has instruction on how to build the application from sources
The application can be deployed in any Java application container. Here we assume Apache Tomcat as the application container.
- The HOME environment variables must be set for the application server Java process. Please follow the process for defining environment variables for the application server on your operating system to set this value if not set. E.g. for Tomcat on Ubuntu installed through the package manager the HOME variable must be defined in /etc/default/tomcat
- Open the application configuration file petstore-tn-config.properties and set the parameters below:
#database connection properties
dbConnectionURL=jdbc\:mysql\://<Hostname>:3306/petstore_db
dbUsername=<DB User Password>
dbPassword=<DB User Password>
dbInitialized=false

#log4j configuration
log4j.appender.R.File=<Path to Log File>
log4j.appender.R.Append=False
log4j.rootLogger=INFO, R
log4j.debug=TRUE
log4j.appender.R.MaxFileSize=1MB
log4j.appender.R.layout=org.apache.log4j.PatternLayout
log4j.appender.R.MaxBackupIndex=10
log4j.appender.R.layout.ConversionPattern=%d{yyyy-MM-dd HH\:mm\:ss} %p - %m%
log4j.appender.R=org.apache.log4j.RollingFileAppender
The properties specified in <Property to set> must be set in order for the application to successfully deploy
- In MySQL create the database petstore_db and ensure the database user specified in the connection properties has all privileges to petstore_db
- Deploy the application WAR in the application container at a context path of your choosing (e.g. petstore-tn). If the steps above are followed the application should successfully deploy and you should be able to view the application.
Step by Step guide to Trust Enable Petstore application
Step 1: Create and Deploy User Authentication Authority
The user authentication authority is a Database Authentication authority. Please enter the following values to create the user authentication authority:
- Sign into the Administrative Console
- Click Create New Authority.
- Select Database Authentication from the Authority Type drop down.
- Enter PetstoreUserAuthentication for Authority Name.
- Enter Petstore User Authentication for Authority Display Name.
- Optionally enter a value for Authority Description
- Enter the fully qualified host address where the TNaaS Authority Connector will be deployed. This host must be a publicly accessible address on the internet
- Configure the connection to the Database server by entering:
- The fully qualified hostname of the database server in the Database Host box: localhost if deploying to a locally running MySQL server
- The name of the database you specified in petstore-tn-config.properties (petstore_db) in the Database Name box
- The database user’s username in the Database User Name box, must be the same as the dbUsername property in petstore-tn-config.properties
- The database user’s password in the Database Password box, must be the same as the dbPassword property in petstore-tn-config.properties
- For the Database Authentication Attributes fields enter the following:
- user for Authentication Table
- email_address for UserId Column Name
- password for Password Column Name
- Check the Password encoded as MD5 checkbox
- Click Save to create the user authentication authority.
To deploy and start the user authentication authority follow these steps:
- Click on the
 icon in the Authorities list next to the Petstore User Authentication authority you just created and download the Authority connector ZIP file. Copy this over to the server that you specified for TNaaS Authority Connector Host
 - On a Linux server you can simply unzip the ZIP file and execute sudo bash tnaas-authority.sh [-c path/certificate_file -k path/private_key_file]
where the -c and -k flags are required only if you specified the https protocol in the TNaaS Authority Connector Host box when configuring the authority. You can run the Authority connector on a non Linux server, the python runtime is required to be present and you simply need to execute python TNaaSAuthority.py [-c path/certificate_file -k path/private_key_file] from the directory you extracted the authority connector ZIP to. - Return to TNaaS Admin page and turn the authority online by clicking the ON/OFF button next to the user authentication authority.
- The authority is now online and ready to receive requests. To test if the authority is functioning correctly:
- First create a user in the Petstore application database by going to <host>/<petstore-app-context-path>/signIn.jsp and click on “SignUp” and enter your user info and “Create Account”. A user entry will be created in the user table of petstore_db
- Click on the Test Authority Icon
 and enter the email address and password and Test Authority button. If the authority is functioning correctly you will see the GRANT message.
Step 2: Create and Deploy second factor Phone Authentication Authority
The second factor authentication authority is a Database Policy Authority that performs 2 functions, it checks if the user is activated and extracts the phone number from the user table of the petstore_db database and invokes the Phone Authentication authority. Please enter the following values to create the second factor authentication authority:
- Sign into the Administrative Console
- Click Create New Authority.
- Select Database Authentication from the Authority Type drop down.
- Enter PetstorePhoneAuthentication for Authority Name.
- Enter Petstore Phone Authentication for Authority Display Name.
- Optionally enter a value for Authority Description
- Enter the fully qualified host address where the TNaaS Authority Connector will be deployed. This host must be a publicly accessible address on the internet
- For Runtime Parameters create one entry with Name: userid, Display Name: User Id and the Initial Request box checked
- For Database Connection Attributes enter the values as for the user authentication authority:
- The fully qualified hostname of the database server in the Database Host box: localhost if deploying to a locally running MySQL server
- The name of the database you specified in petstore-tn-config.properties (petstore_db) in the Database Name box
- The database user’s username in the Database User Name box, must be the same as the dbUsername property in petstore-tn-config.properties
- The database user’s password in the Database Password box, must be the same as the dbPassword property in petstore-tn-config.properties
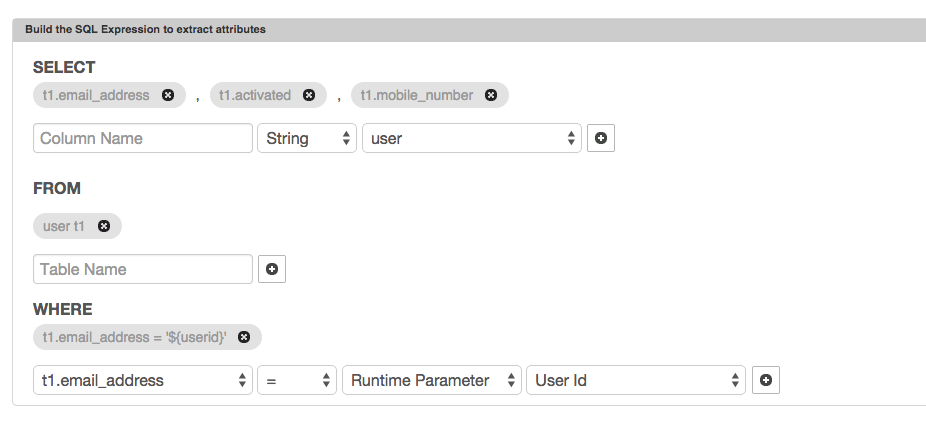
- For the SQL Expression to extract attributes create a SQL expression as shown below:
- For the Configure Output Policy section, click on Create Output Policy button. In the Output Policy popup:
- Select Phone Authentication from the Resilient Networks Authorities list and drag and drop it to the Policy drop area.
- Click on the In Policy checkbox next to Mobile Phone parameter in the Configure Parameters section. Leave the Type to User Supplied.
- Click on the Create button to create the output policy
- In the Configure Policy Parameters section, select Query Result for Mapped Type and t1.mobile_number for Mapped Value
- Click Save to create the second factor authentication authority
To deploy and start the second factorauthentication authority follow these steps:
- Click on the icon in the Authorities list next to the Petstore Phone Authentication authority you just created and download the Authority connector ZIP file. Copy this over to the server that you specified for TNaaS Authority Connector Host
- Extract the ZIP file and copy the 2 files PetstorePhoneAuthentication_<ID>.key and PetstorePhoneAuthentication_<ID>.config to the tnaas_authority directory you had deployed the user authentication authority connector to.
- Return to TNaaS Admin page and turn the authority online by clicking the ON/OFF button next to the Petstore Phone Authentication authority.
- The authority is now online and ready to receive requests. To test if the authority is functioning correctly click on the Test Authority Icon and enter the email address for the user account created and Test Authority button. If the authority is functioning correctly you will see the GRANT message and the attributes retrieved from the user record.
Step 3: Create the application authentication policy
Follow the steps below to create the policy to authenticate into the Pet Store application:
- Sign into the Administrative Console
- Click Create New Policy
- In the policy builder page, select the authorities for your organization from the Authorities selection control.
- Select Petstore User Authentication and drag it to the Policy drop area.
- Select Petstore Phone Authentication and drag it to the Policy drop area.
- Leave the Configure Parameters section in their default settings and click Next button
- Enter PetstoreAppAuthentication for Policy Name
- Enter the host domain and port of the server you will be deploying the Pet Store application to (e.g. https://test.acme.com). This ensures that the Trust Network will only serve policy evaluation requests for your application when it is hosted on this domain.
- Optionally enter a Policy Deny Message. This message can contain any HTML content with action links such as email to a support email address, an authentication redress URL etc. In our case you may enter something along the lines
Authentication to the Pet Store application failed. You must successfully complete the two factor authentication, password challenge and phone authentication to gain access to the Pet Store application
- Select Access Web Application tab in the Policy Used For section. Select Java Servlet/JSP for Web Application Technology and the application context path (e.g. petstore-tn for Application Name
- Click Save to create the application authentication policy.
- In the policy list click the to download the application plugin ZIP file
- You may test the policy evaluation by clicking on the icon for the application authentication policy
Step 4: Create the user activation policy
The user registration process involves an activation step that ensures the email address entered by the user is an account that belongs to them. This is enforced by performing an Email Authentication of sending a code to the email address entered in the account creation form and challenging the user to enter the code in the email they receive. Only on entering the correct code the user account is activated. The steps for creating this policy are:
- Sign into the Administrative Console
- Click Create New Policy
- In the policy builder page, select the authorities for Resilient Network Authorities from the Authorities selection control.
- Select Email Authentication and drag it to the Policy drop area.
- Leave the Configure Parameters section in their default settings and click Next button
- Enter PetstoreActivation for Policy Name
- Enter the host domain and port of the server you will be deploying the Pet Store application to (e.g. https://test.acme.com).
- Select Access Web Page in Policy Used For section and click the checkbox for Hide Trust Tag header.
Step 5: Create the payment processing policy
To demonstrate additional restrictions enforced through policies within an application we enforce an identity verification policy before the payment is processed. Follow the steps below to create this policy:
- Sign into the Administrative Console
- Click Create New Policy
- In the policy builder page, select the authorities for Resilient Network Authorities from the Authorities selection control.
- Select Knowlege Based Authentication and drag it to the Policy drop area.
- In the Configure Parameters section select all the parameters except for Date of Birth and leave them in the User Supplied option. Since the checkout process asks for the user’s name and address we can directly pass these to the Knowledge Based Authentication authority without requiring the user to enter this information twice. Click Next button
- Enter PetstorePaymentAuthorization for Policy Name
- Enter the host domain and port of the server you will be deploying the Pet Store application to (e.g. https://test.acme.com).
- Enter a custom message in Policy Deny Message if you wish.
- Select Access Web Page in Policy Used For section and click the checkbox for Hide Trust Tag header.
This concludes the configuration in TNaaS for trust enabling the Pet Store application
Applying the policies into the application
Small amount of changes are needed in the application to integrate it with TNaaS and make it a policy protected application. These are:
- Copy the plugin ZIP downloaded in Step 4 to the server the application is deployed to and extract the ZIP file into the application root path. A new directory rns is added to the application. The contents of the plugin ZIP are explained here
- Edit the file /<petstore_app_root>/rns/enforcePolicy.jsp and replace the ‘/rns/login.jsp‘ with ‘signIn.jsp‘. This changes the redirect URL for an un-authenticated session to the customized signIn.jsp page instead of the default application login prompt provided when application policy is enforced.
- Edit the file /<petstore_app_root>/appHeader.jsp and add the line
<%@include file="rns/enforcePolicy.jsp"%>
This will enforce the application authentication policy when any app page is accessed.
- Edit the file /<petstore_app_root>/activate.jsp to enforce the user activation policy.
- Go back into TNaaS Admin console and click the icon for the PetstoreActivation policy and copy the SCRIPT tag.
- Paste the script tag within the <jsp:attribute name=”trustTagScript”> tag
- Remove the $(document).ready event hander as specified in the comment above it
- Go back into TNaaS Admin console and click the
- Edit the file /<petstore_app_root>/confirm.jsp to enforce the payment processing policy.
- Go back into TNaaS Admin console and click the icon for the PetstorePaymentAuthorization policy and copy the SCRIPT tag.
- Paste the script tag within the <jsp:attribute name=”trustTagScript”> tag
- Remove the $(document).ready event hander as specified in the comment above it
- Go back into TNaaS Admin console and click the
Now you are ready to access the trust enabled version of the Pet Store application!
-- Download Trust Enable Pet Store Application as PDF --